Description
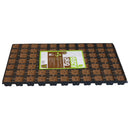
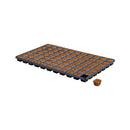
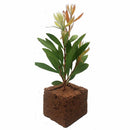
Enhance seed germination and cutting rooting success by utilizing Eazy Plug Coco Peat plug & grow Propagation Trays.
These specialized organic propagation plugs are meticulously crafted to uphold the perfect balance of water, air, and nutrients, fostering robust and thriving plant development.
Germinating seeds
Fully moisten the plug and put your seed in the seed hole. Put a thin layer of Eazy Mixx top-layer soil on top of the plug and spray thoroughly with water. Make sure the plug can drain excess water and put it away in a humid and warm environment. Then wait to see the miracle happening. It is that simple!
Strike cuttings
Fully moisten the plug and put your cutting all the way into the cutting hole. Make sure the Eazy Plug can drain excess water and put it away in a humid and warm environment. No rooting gel or powder is necessary.
Easy to transplant
The Eazy Plug will always remain firmly bonded together as a whole. This minimises the risk on root damage during sorting, transplanting or replanting, thus preventing the plant from diseases.
Limitless shelf life
The Eazy Plug is supplied dried, making it clean and lightweight, with limitless shelf life and no risk of molds. It takes water back up very easily and quickly, retaining all of its former characteristics.
The EazyPlug system is designed to work with a variety of different types of plants, including vegetables, herbs, flowers, and more, and they are suitable for use in a range of environments, from commercial greenhouses to home gardens.
These propagation plugs are an excellent choice for anyone who is looking for a reliable and effective way to propagate plants from seeds or cuttings.
- RHP Certified
- Easily re-hydrated if required
- Easy to use plant starter cubes
- Made from organic materials
- Fully compostable & biodegradable
- For all different types of cuttings and seeds
- Amazingly fast and vigorous rooting
- Perfect air to water ratio
- Easy and safe plant transfer into rockwool, coco, perlite etc.
Features:
A predetermined pH with buffering:
By adding special components that are pH buffered, the Eazy Plug has a predetermined pH value which is retained even after adding water and/or nutrients with different pH values. This makes the pH stable and less prone to user error and easier to manage.
A predetermined value by buffering EC:
During production the EC value of the plugs are set and buffered so that the EC value does not have to be built to a specific level. That level remains stable and easier to control.
Open structure so that the water / air management is always good:
Too much water is almost impossible, if the trays / plugs just can drain. The Eazy Plug drains the excess water, so there is always enough air left for an optimum root environment.
Kick Start for the first 2-3 weeks:
The plugs provide a great start for the first 2-3 weeks. After this period you will have to provide nutrient. The construction (buffering) of the plugs means there is no chance of over-fertilisation, which allows you to add a nutrient right from the start.
Compatibility with rockwool:
The composition and structure of these plugs allows easy integration with rockwool. Root growth will continue from the plugs into the rockwool, and the water balance is maintained.
The plug will easily absorb water again:
Even if the plug has completely dried out, it can be easily restored by adding water. All the original features remain intact.
Compostable:
The Eazy Plug consists largely of organic material and as a whole is compostable.
How to use -
Step 1: Moisten the Eazy Plug
Allow the Eazy Plugs to fully suck up water with a pH of 5.8.
Let it drain out excess water. Do not squeeze out or dry the plugs. Eazy Plugs are self-regulating and will only hold the water they need for an optimum moisture level and an optimum air-to-water ratio. The plug will feel much heavier than Rock-Wool, but that’s normal.
Step 2: Take cutting
Cut diagonally at a 45 degree angle just below a node or stem swelling, making sure to keep at least 3 nodes above your intersection.
Remove all but a couple of leaves. Scrape a little of the outer layer at the bottom of the cutting, but not all around. Cut off ⅓ of the top of remaining big leaves.
Step 3: Root stimulator
If you want to make use of a rooting powder (for example Rhizopon), dip the base of your fresh cut cutting into the rooting powder.
Step 4: Insertion in Eazy Plug
Insert the cutting into the Eazy Plug cutting hole. Make sure to insert it deeply enough, completely to the bottom of the cutting hole.
Step 5: Put into propagator
Put the tray with Eazy Plug into a propagator.
Close the lid of the propagator and shut any present air vents to keep the humidity inside the system.
Step 6: Remoistening and fresh air
Only remoisten the Eazy Plug after 3 days and keep on doing that every 3 days until the first appearance of roots.
Briefly open the propagator every day for a little fresh air.
Open the air vents slightly at the earliest after 4-5 days. Humidity should remain above 80%, as too much loss of humidity can seriously effect your success rate.
Step 7: Assure drainage of excess water
Make sure Eazy Plug is able to drain excess water at all times, so it can always self-regulate the correct amount of moisture. Never let the bottom of the Eazy Plug touch water, as the moisture absorption of Eazy Plug is exceptionally good and the Eazy Plug will quickly become too wet, which will have a negative effect on the rate of success.
Step 8: Open air vents
After the first roots have developed, you can gradually open the air vents further in order to acclimate the cutting to a less humid environment.
Step 9: Transplant
In 7-9 days from start your cutting should have grown its roots throughout the Eazy Plug and it is time to transplant them.
Conditions for developing roots:
1. Temperature: The optimum soil temperature for striking roots is 22º Celsius. Above 23º Celsius, you must consider a rise in failure rate.
2. RH (humidity): RH of 80-95% is perfect. As the cutting needs its energy for striking roots, the moisture level of leaves and stem should remain intact.
3. Light: In the first few days the cutting will form callus, from which the roots will start to grow. In this phase the cutting only needs tempered light with a broad spectrum (regular assimilation light). After the development of roots the amount of light can be gradually increased.
Estimate shipping
Payment & Security
Your payment information is processed securely. We do not store credit card details nor have access to your credit card information.


